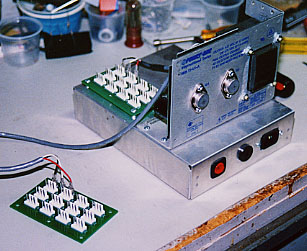
Chuck McQuillan’s Power Supply

The Power-1 unit (7 in. wide) is mounted on a 9 in. X 7 in. X 2 in. aluminum chassis, 2
inches from the back end. Setting the weight back a little helps to stabilize it, and still
leaves room for a chassis mounted PCB-900. Along the back edge are, from left to
right; lighted power switch, fuse holder salvaged from the surplus Power-1's OEM
bracket, and an IEC power connector. The switch and IEC are available at Radio
Shack. When the supply assembly is inside the cabinet, these items are accessible
through a 2 inch gap in the bottom of the cabinet door. The tricky part was cutting a
rectangular hole for the IEC socket (the switch looks like it's in a square hole, but that's
just the flange of the mounting nut). I used a Dremel drill with a cutting wheel (wear eye
protection!), then filed to size.
One advantage of mounting the Power-1 to an aluminum chassis; thermal conduction. It
becomes part of the Power-1's frame/heat sink, creating more cooling area. However, if
anyone plans on mounting a Power-1 in a wood cabinet, you MUST use spacers to
allow air flow around the frame, unless, as Paul S. once put it, you enjoy the smell of
smoldering wood.
Also, the reason the second PCB-900 is loose on a cord is because the standard
length MOTM power harnesses won't reach to the top row in the 3-row cabinet. So it
just sorta dangles back there for now...