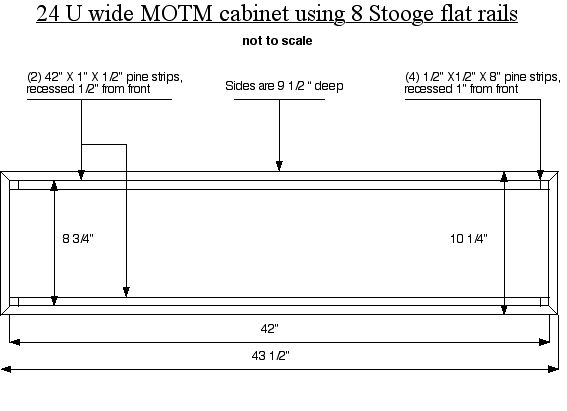
Click on diagram for dowload or larger version.
Chuck McQuillan’s 24U wide, 1 row cabinet
While learning to use the drawing module in Appleworks, I ended up
turning my blueprint into a short construction article. So here goes,
I'm assuming some previous woodworking, and a sense of humor...
The sides are cut from what is labeled * 10" X 1" * solid pine, which is
actually 9 3/4" X 3/4"! My dimensions are actual, the design looks sane,
but keep in mind I haven't built this thing yet. A table saw with a fence
is a must for this project, don't even think of using a hand saw. Find a
local woodworker's club, hang out for awhile, and see if you can borrow
someone's tools. Good luck.
The two 42" strips are for mounting the Stooge rails. Use glue and 1"
finishing nails to mount these inside the cabinet to the depth you want
your MOTM knobs to be, keeping in mind the extra 1/8" of the flat rails.
I suggest mounting the front edge of the rail mounting strips 1/2"
inside the front edge of the cabinet. Also, if you want to keep using
your 3/8" 8-32 panel screws, you will need to lower the blade on your
table saw and set the fence so as to put a 1/8" deep groove down the
center of the facing (1/2") side of these strips. This allows the ends
of the screws some clearance when you fasten the panels down. Space the
nails so they don't intersect any mounting holes on the rails. There's
some blank real estate about 2 3/4" in from each end of the rail.
The 45 degree angle corner joints aren't essential, it depends on how
fancy you want to get. Lap joints will work, as well as dovetails,
mortise & tenon, and the ever-popular butt-joint. A router will probably
come in handy here somewhere. Use it with a rounding bit to round off
the edges of the cabinet sides, including the inside front edges. You
don't want to snag a sliver while twirling knobs. At this point, if
you've been able to borrow both a table saw AND a router from our
hapless woodworker's club member, you might as well go for a couple
of corner clamps. This guy is a real sucker. In any case, the 1/2" corner
strips provide strength as well as area for the fastener of your choice.
I'm going to try wood dowels as pegs; when stained and finished, it
should have the 'Shaker' look that compliments analog so well. Put a
hand crank on the side for effect.
Oh, and be sure to get those tools back "real soon." Thank you and
good night! Here’s the diagram: